Showing posts with label journaling. Show all posts

Saturday, August 29, 2015

Artful Journeys Week 35 - Sweet Memories

It's funny.  When I first started planning this prompt, I was grousing and grumbling about how I was already over it and hadn't even started the damn thing yet, lol.  But once I got started painting it, I knew I had to finish it, because the memories it brought back were ones I had almost forgotten and now I never will.  Before my folks split up in 1976, we used to go to the lake all the time to fish and camp.  One of my most favorite things to do was to catch fireflies after dinner, and while my mother was freaking out about ticks and whatever else she could think of, my daddy was in the bushes with me, helping me catch fireflies.  I never kept them for long, certainly not more than an hour, but that hour was long enough, and the memories are so wonderful...sometimes the most irritating noise, or a seemingly aggravating prompt, can refresh our memories and bring a smile to our faces after all.  

So let me tell you what I did...

I actually painted over a background in my altered book because I didn't like the way it had turned out, so down went 4 shades of red, some orange and some purple...once all that was dry, I then went across the bottom of the page with black, making trees and bushes for my fireflies to play in.  I used a nail art tool and a toothpick to create my little fireflies, then added some acrylic inks to give the image of the setting sun reflecting off the clouds in the sky...I added a few stars as well, then my little quote.  I ended up having quite a bit of fun with this quote even though I was not even close to being jazzed about it when I started.  
The initial layer

After the "trees" were added.

Here it is after the acrylic "clouds" and fireflies were added.

And here with the "stars" and the quote.

Left page

Right page

close up of the quote.


That's usually how it goes for me, although occasionally I will find one that I still don't like even after I'm done with it.  But that's what art and this group is all about...pushing yourself to step outside of your comfort zone and try new things...even if they're only new to you.

So there you have it....my take on this week's prompt.  I hope you enjoyed it, and thanks so much for stopping by.

Later, y'all!!

Saturday, May 30, 2015

Artful Journeys - Week #22 - Resists!!!!!

Hey, y'all!  Well, I'm back again, and this week over at Artful Journeys we did resists.  Now I am no perfectionist by any stretch of the imagination, but even this one originally pissed me off...lol.   

I started by trying a crayon/watercolor resist....can you say, "EPIC FAILURE"?  Here, let me show you!


The bottom one was AFTER I tried scraping some of the paint off the crayon, but I am going to say that my crayon was just defective...yeah, that's it. HA!!!

But!  I didn't let it get to me (that's not true - I cussed.  A lot.  Enough that it got the attention of my sailor husband, lol)  but I kept going.

So, just for shits and giggles, I tried it again, this time in my large Dylusions journal.  Um, no, this was even worse than the damn index cards, look

Here's the entire spread...what do you see?  You can SORT OF see ONE damn flower in the middle of the left page.

Oh, look, a swirly, that you can see if you get about 3 inches from the damn page

Here's part of a flower

And I believe this is the flower you can see in the pic of the whole spread.  Gah
So clearly the defective crayon went to a place we shall call "File X".  So, I walked away for the night, disgusted and discouraged and not entirely sure how this whole thing was gonna work out.  How can I blog about a resist if I can't get any resistance?

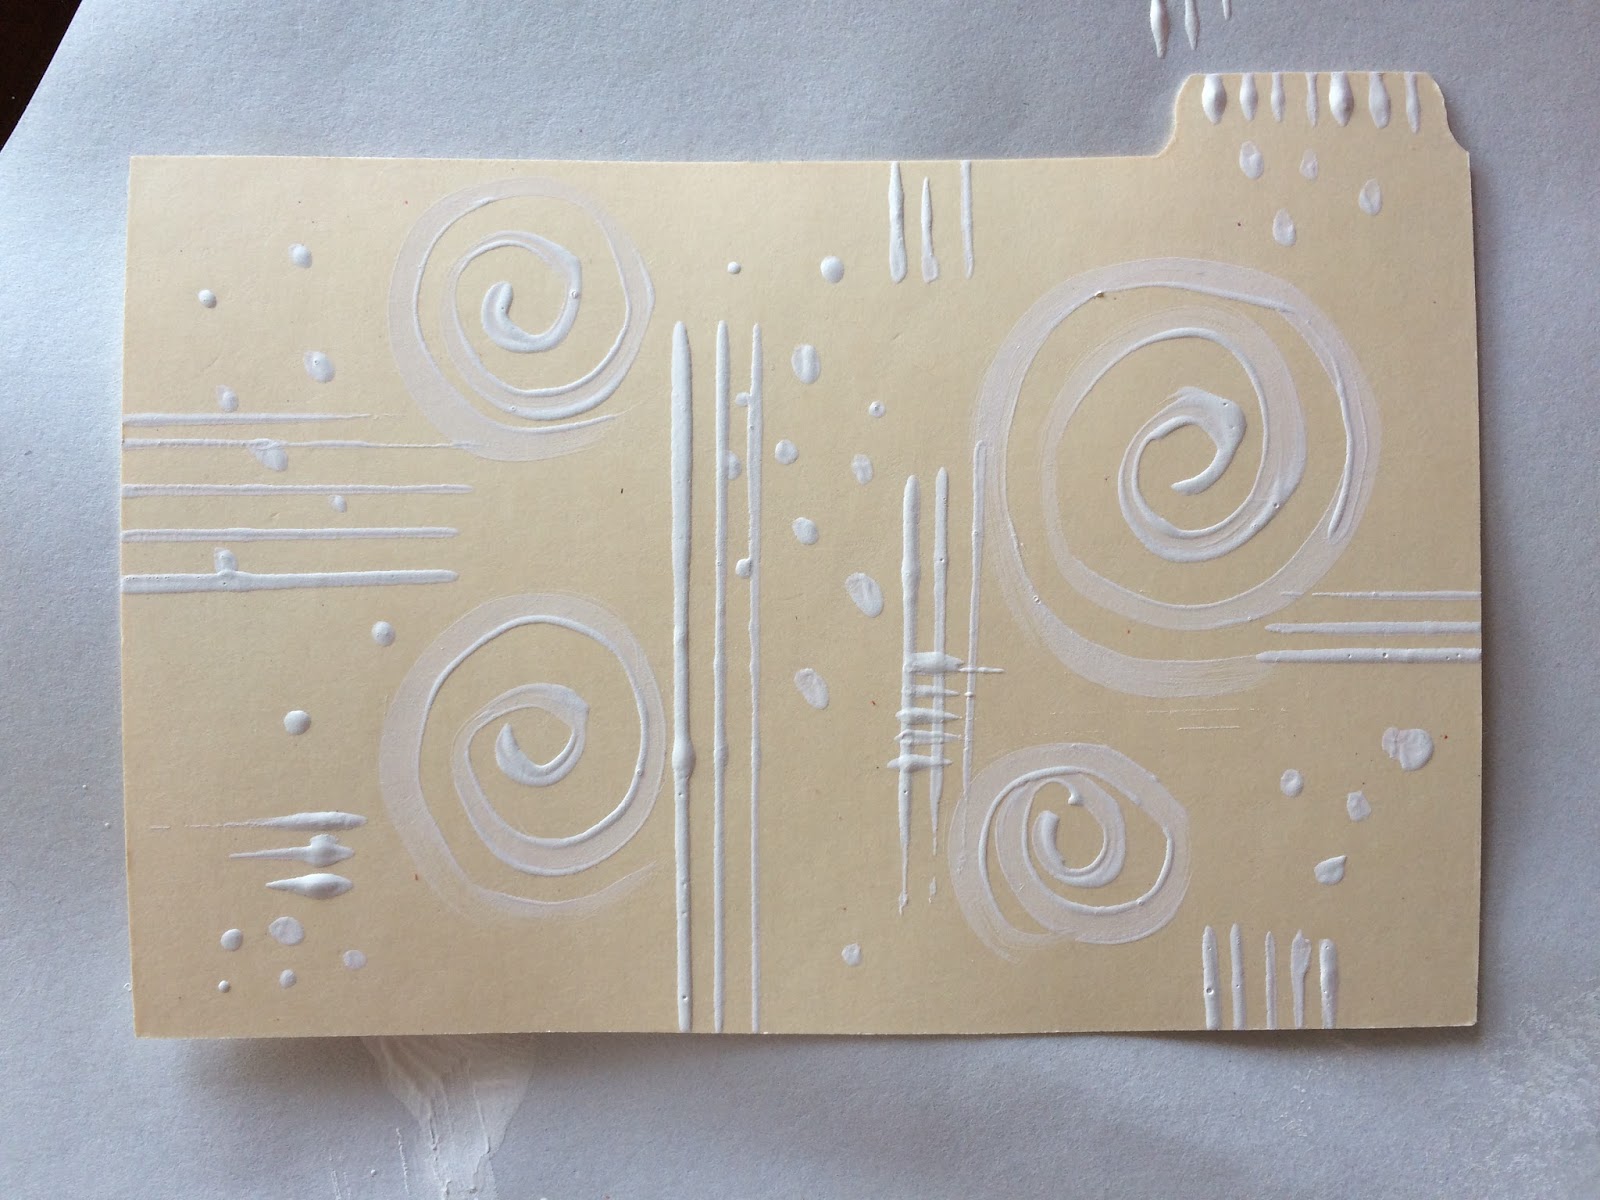
So, the next morning, after the hubby went to bed for the day, I pulled out some gesso and some Dylusions spray inks.  I KNEW this one would work, because I'd done it before after seeing it on Pinterest!  Grabbing a couple of index card dividers, I tarted them up with my gesso.


Nothing too fancy, just a paintbrush, and a credit card...it was fun!  Then of course, I had to wait for it to dry...luckily I had to go get the kids from school (or unfortunately depending on how ya look at it), so there was an hour of built in drying time...woohoo!!!!!!!!

Next came the inks!  Lemon Zest and Vibrant Turquoise on one, and Ripe Tangerine and Funky Fuchsia on the other!

How damn cool is that!?!?!?!?!?!?!?!!!!!

Encouraged by success, I moved it over into my journal on a larger scale, and came up with THIS awesomeness!!!  

Here's the full spread...sweet baby Pete how I love the way this came out!

The left page

The right page

Another shot after I added a couple of elements...I know it's not finished...DEFINITELY needs more, but for now, I'm good.

A stamp from a set called All About Me by Kaiser Craft that I was led to by the amazingly talented Tracy Scott.

It's funny how sometimes, when you're dismantling a dictionary, you come across a few definitions that seem to be talking to you, or about you.

Further encouraged, I took the advice of my dear friend, Betty, and grabbed a white wax pastel, and tried THAT with some watercolor, and got this surprising (to me) result that I also love.

I did this on a big chunk of watercolor paper.  Looking at the picture I realize it's kinda hard to see the white in the yellow, but I assure you it's there!  
That's not all I've created over the last couple of weeks, either!  Check these out!
This is what happens when you art just to art, lol.  I decided to screw around with a different color combination (definitely one I do NOT normally play with) and really shocked the hell out of myself with this spread.  I absolutely LOVE it!!!

This page actually started with that little piece from a journaling card and some leftover pink paint smeared all over the pages.

This one came from me forcing myself to create something when my muse was busy ignoring me.  I figured out later that she didn't care for the way I had rearranged the dining room table (my studio).  Once I put my stuff back where it belonged, I could immediately feel the difference.
So, that's what I have to share with you this week...although, before I go, let me just show you what crazy rainfall will do!

See those black poles, just past the yellow caution tape?  That is where the edge of this parking lot actually is...Those trees are way underwater.

See the fence?  That fence is running down the 3d base side of a softball field...that is completely under water.  Crazy, right?
And as I type this post, it's raining...again.  So, I'm gonna go grab my rain boots and dance in a couple of puddles, y'all go create something beautiful!  Thanks for stopping by, and please, leave some blog love!

Saturday, May 16, 2015

Week 20 - Use a paper napkin in your background

Well, after a long, stressful week, it was nice to have a go in my art journal.  Our prompt for this week, at Artful Journeys, is to use a paper napkin in our background.  I have a love/hate relationship with paper napkins.  I mean, really, they aren't all that great for getting something clean, but that's what you get when you're on the go, right?  Then there are the paper napkins with designs/pictures on them....they're even less useful...UNLESS you are using them in your art!!  Paper napkins have 3 layers...the printed layer, then 2 others...and we just want the printed layer.  In order to get that, you have to separate the layers....well, the back layer comes off quite easily.  It's the middle layer that does NOT like to leave it's little printed friend.  I have found the easiest way to separate the middle and front, is to lick my index finger and rub it against my thumb, then pinch the napkin and SLOWLY separate my thumb and finger.  Sometimes it takes a couple of tries, but it's what works best for me.

So earlier in the week I received a cute little cocktail napkin from a member of one of the groups I'm in.  Beautiful butterflies all over it.  So I knew I wanted to use that in my spread.  From there it was just a matter of what else I wanted to throw down onto my pages.  I can't give you an exact supply list, sorry, as some of the things I used came from happy mail, or as extras in one of the swaps I participated in, but I think I can come close.

So, of course, there was my Large Dylusions journal, Liquitex acrylic paints in Medium Magenta, Titanium white and Amsterdam paint in Turquoise.  drywall tape, tissue paper, Tim Holtz photo booth images, book pages, Tim Holtz rub ons, some sort of material stuff with glitter on it, a rubber stamp with black archival ink and of course my paper napkin.

Once I painted my background, I went thru and painted some circles onto the page, but alas, they were WAY to dark, so I cut some circles out of a book page and laid them over the painted circles, then painted on top of them.  Then I came thru with my drywall tape, weird material stuff, book pages and tissue paper, just tearing and laying shit down where it seemed like it needed to go.  There was not a lot of "planning" with this spread after the napkin was picked out, I just let it happen.  

Now for my napkin, I didn't follow the usual rule for putting them down.  I laid down some glue with my trusty UHU glue stick, then laid my single layer down on top of the glue, gently smoothing as I went.  I like doing it this way, because I tend to get pissed when I can't write over the top of my work.  Then a little while later, I came back to my napkins and began pulling(tearing) at the edges of the napkin that weren't glued down, ripping away the leftover and leaving behind part of the napkin and creating a look that I really like.

The Tim Holtz photo booth pictures actually came into play as an afterthought, as I thought that my spread was lacking something....and I was right.  The minute I laid those 2 pics down on to the spread, I knew they would finish it for me.  

I have included a bunch of pictures below so that you can see the various elements and layers used along the way...I hope you find some inspiration here, and thank you so much for stopping by to look.  Don't forget to leave me some love!

Here is a shot of the entire spread.

A shot of the left page

A shot of the right page.

A close up of the butterfly napkin on the right page.

And on the left page.

A shot of the drywall tape painted with turquoise paint, and that weird thick paper like material.  You can't see it in the picture, but the design on it is white with glittery silver accents.

You can see the design in this pic

A close up of the rub-on and other elements.

Another closeup.

Here you can see where I laid down the paper circle over the top of my painted circle.  The circles were just too dark for the page.

And one final close up.
So there you have it!  I hope you enjoyed this week's spread.  I can't wait to see what you create!

Happy arting, y'all!!!!!

Friday, April 3, 2015

Clarity and a Calendar for April

Every once in a while, I shock the shit out of myself with the art I put onto canvas and in my journal....today was really no exception to that, except that there wasn't my usual string of cussing when I screwed up!

So, I grabbed my large Dylusions journal and started off by gluing down a bunch of paper scraps, then adding paint....

As you can tell, I am not afraid to use some color...and a lot of it!  But, to be honest, looking at it like this makes me kind of nauseous...lol.  That's a lot for a brain to take in right there...but I knew that was only the beginning....the 2nd layer as it were.

Next, I used a homemade "mask" to create my flowers, then put white gesso down between them.  Of course, there were a couple of times, when I got carried away and painted right over one of my flowers, so I had to repaint them, but all in all, not too terrible.

Next came the black....This was the total tip over point for me.  Those flowers didn't just jump off the page, they exploded!  This layer took the longest...mainly because when I first went in with the black, I used my acrylic paint, which dried shiny and tacky, and I did NOT want my page ruined by the damn thing sticking to itself, so I went back over it with black gesso.  I really love gesso...so helpful!

Then I grabbed my white uniball and made little dots all around all the flowers...so far, so good.  But it was still lacking a little something.  Stamps!  I wanted to add some stamps...something I probably should have done BEFORE I did all the painting around the flowers, but you know....hindsight is 20/20...so I grabbed my flower and a piece of copy paper to make a "stencil".  Lining it up over the flowers I then stamped thru the stencil onto the page.


Now I'm getting somewhere!  I don't know if it's finished yet, or not, but I do love how it's looking so far!  Here are a couple of closeup shots....


I have to say, while it's not my first time doing a page like this, it is the first time I've set out to do this, and I am so pleased with the results.

And, since it's a new month, that means a new monthly calendar in the journal....This one was actually quite a bit of fun....Purple and white...that's it...just 2 colors of paint, some scrapbook paper, a punch and some rubber stamps.  In my creative frenzy, I got carried away and punched AND glued down 31 squares for the month of April.  This was right after I'd done the how many days in a month thing in my head...go figure...I blame shit like this on my teenagers...it's more fun than saying I'm not the sharpest tool in the shed...lol.


The big stamp in the bottom right corner says "I love Paris in the spring time"...I don't know if I do or not, but maybe one day I can find out....I'm going to say that I probably do...I can't think of too many places that aren't made perfect by Spring.

That's what I have for you so far this week.  I hope you enjoyed looking...please leave me some blog love so I know you stopped by!  Thanks 

Later, y'all!